Get Started with the Kotlin Sync Driver
On this page
- Overview
- Download and Install
- Create a Kotlin Project
- Add the Driver Bill of Materials
- Add MongoDB as a Dependency
- Add Serialization Library Dependencies
- Create a MongoDB Deployment
- Create a Free MongoDB deployment on Atlas
- Save your Credentials
- Create a Connection String
- Find your MongoDB Atlas Connection String
- Copy your Connection String
- Update the Placeholders
- Run a Sample Query
- Create the Application File
- Run the Application
- Use the Document Class to Model Data (Alternative)
- Next Steps
Overview
You can use the Kotlin Sync driver to connect to and communicate with MongoDB. This guide shows you how to create an application that uses the Kotlin Sync driver to connect to a MongoDB cluster hosted on MongoDB Atlas and interact with data.
Tip
MongoDB Atlas is a fully managed cloud database service that hosts your MongoDB deployments. You can create your own free (no credit card required) MongoDB Atlas deployment by following the steps in this guide.
Follow this guide to connect a sample Kotlin application to a MongoDB Atlas deployment. If you prefer to connect to MongoDB using a different driver or programming language, see the list of official MongoDB drivers.
Download and Install
This section demonstrates how to create a project and add the Kotlin Sync driver dependencies by using Gradle or Maven.
Create a Kotlin Project
First, make sure that your system has Kotlin installed and running on JDK 1.8 or later.
We recommend that you use an integrated development environment (IDE) such as IntelliJ IDEA or Eclipse IDE to configure Gradle or Maven to build and run your project.
Tip
If you are not using an IDE, see the Creating New Gradle Builds guide or the Building Maven guide for more information on how to set up your project.
For more information on getting started with Kotlin and creating your first project, see Get started with Kotlin/JVM in the Kotlin language documentation.
Add the Driver Bill of Materials
In your IDE, create a new Maven or Gradle project. Add the Bill of Materials (BOM) for MongoDB JVM artifacts to your project to organize dependency versions. The BOM simplifies dependency management by ensuring that you maintain consistent and compatible versions of dependencies, such as between the Kotlin Sync driver and the core driver library. Use the BOM to avoid version conflicts and simplify upgrades.
Select from the following Maven and Gradle tabs to view instructions for adding the BOM for each dependency manager:
Add the following code to the dependencyManagement list in your
pom.xml file:
<dependencyManagement> <dependencies> <dependency> <groupId>org.mongodb</groupId> <artifactId>mongodb-driver-bom</artifactId> <version>5.4.0</version> <type>pom</type> <scope>import</scope> </dependency> </dependencies> </dependencyManagement>
Add the following code to dependencies list in your
build.gradle.kts file:
dependencies { implementation(platform("org.mongodb:mongodb-driver-bom:5.4.0")) }
To view a list of dependencies that the BOM manages, see the mongodb-driver-bom dependency listing on the Maven Repository website.
Add MongoDB as a Dependency
If you are using Gradle to manage your
packages, add the following entry to your build.gradle.kts
dependencies list:
dependencies { implementation("org.mongodb:mongodb-driver-kotlin-sync") }
If you are using Maven to manage your
packages, add the following entry to your pom.xml dependencies list:
<dependencies> <dependency> <groupId>org.mongodb</groupId> <artifactId>mongodb-driver-kotlin-sync</artifactId> </dependency> </dependencies>
Because you installed the BOM, you can omit a version in the Kotlin Sync driver dependency entry. The version you specify in the BOM determines the dependency versions to install.
After you configure your dependencies, ensure that they are available to your project by running the dependency manager and refreshing the project in your IDE.
Add Serialization Library Dependencies
To enable the driver to convert between Kotlin objects and BSON, the data format for documents in MongoDB, you must also add one or both of the following serialization packages to your application:
bson-kotlinx(Recommended)bson-kotlin
If you are using Gradle to manage your packages, add one of the following
entries to your build.gradle.kts dependencies list:
implementation("org.mongodb:bson-kotlinx") // OR implementation("org.mongodb:bson-kotlin")
If you are using Maven to manage your packages, add one of the following
entries to your pom.xml dependencies list:
<dependency> <groupId>org.mongodb</groupId> <artifactId>bson-kotlinx</artifactId> </dependency> <!--OR--> <dependency> <groupId>org.mongodb</groupId> <artifactId>bson-kotlin</artifactId> </dependency>
After you configure your dependencies, ensure that they are available to your project by running the dependency manager and refreshing the project in your IDE.
To learn more about these packages, see Kotlin Serialization.
After you complete these steps, you have a new project directory and the driver dependencies installed.
Create a MongoDB Deployment
You can create a free tier MongoDB deployment on MongoDB Atlas to store and manage your data. MongoDB Atlas hosts and manages your MongoDB database in the cloud.
Create a Free MongoDB deployment on Atlas
Complete the Get Started with Atlas guide to set up a new Atlas account and load sample data into a new free tier MongoDB deployment.
After you complete these steps, you have a new free tier MongoDB deployment on Atlas, database user credentials, and sample data loaded in your database.
Create a Connection String
You can connect to your MongoDB deployment by providing a connection URI, also called a connection string, which instructs the driver on how to connect to a MongoDB deployment and how to behave while connected.
The connection string includes the hostname or IP address and port of your deployment, the authentication mechanism, user credentials when applicable, and connection options.
To connect to an instance or deployment not hosted on Atlas, see the Choose a Connection Target guide.
Find your MongoDB Atlas Connection String
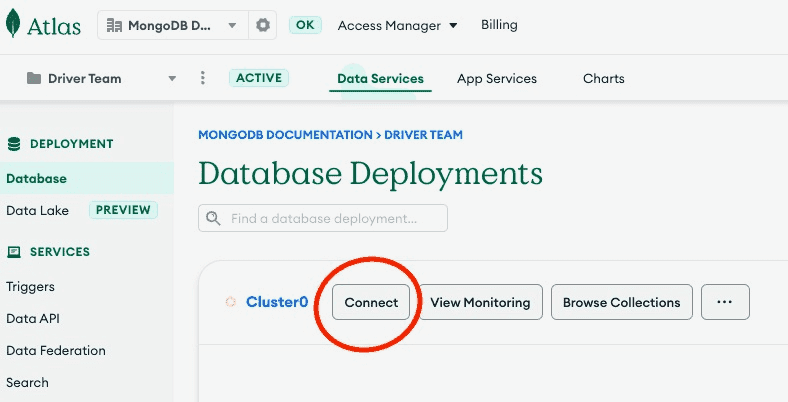
To retrieve your connection string for the deployment that you created in the previous step, log into your Atlas account, navigate to the Database section, then click the Connect button for your new deployment.
Proceed to the Connect your application section, then select Kotlin from the Driver selection menu.
Select the Password (SCRAM) authentication mechanism.
Deselect the Include full driver code example option to view only the connection string.
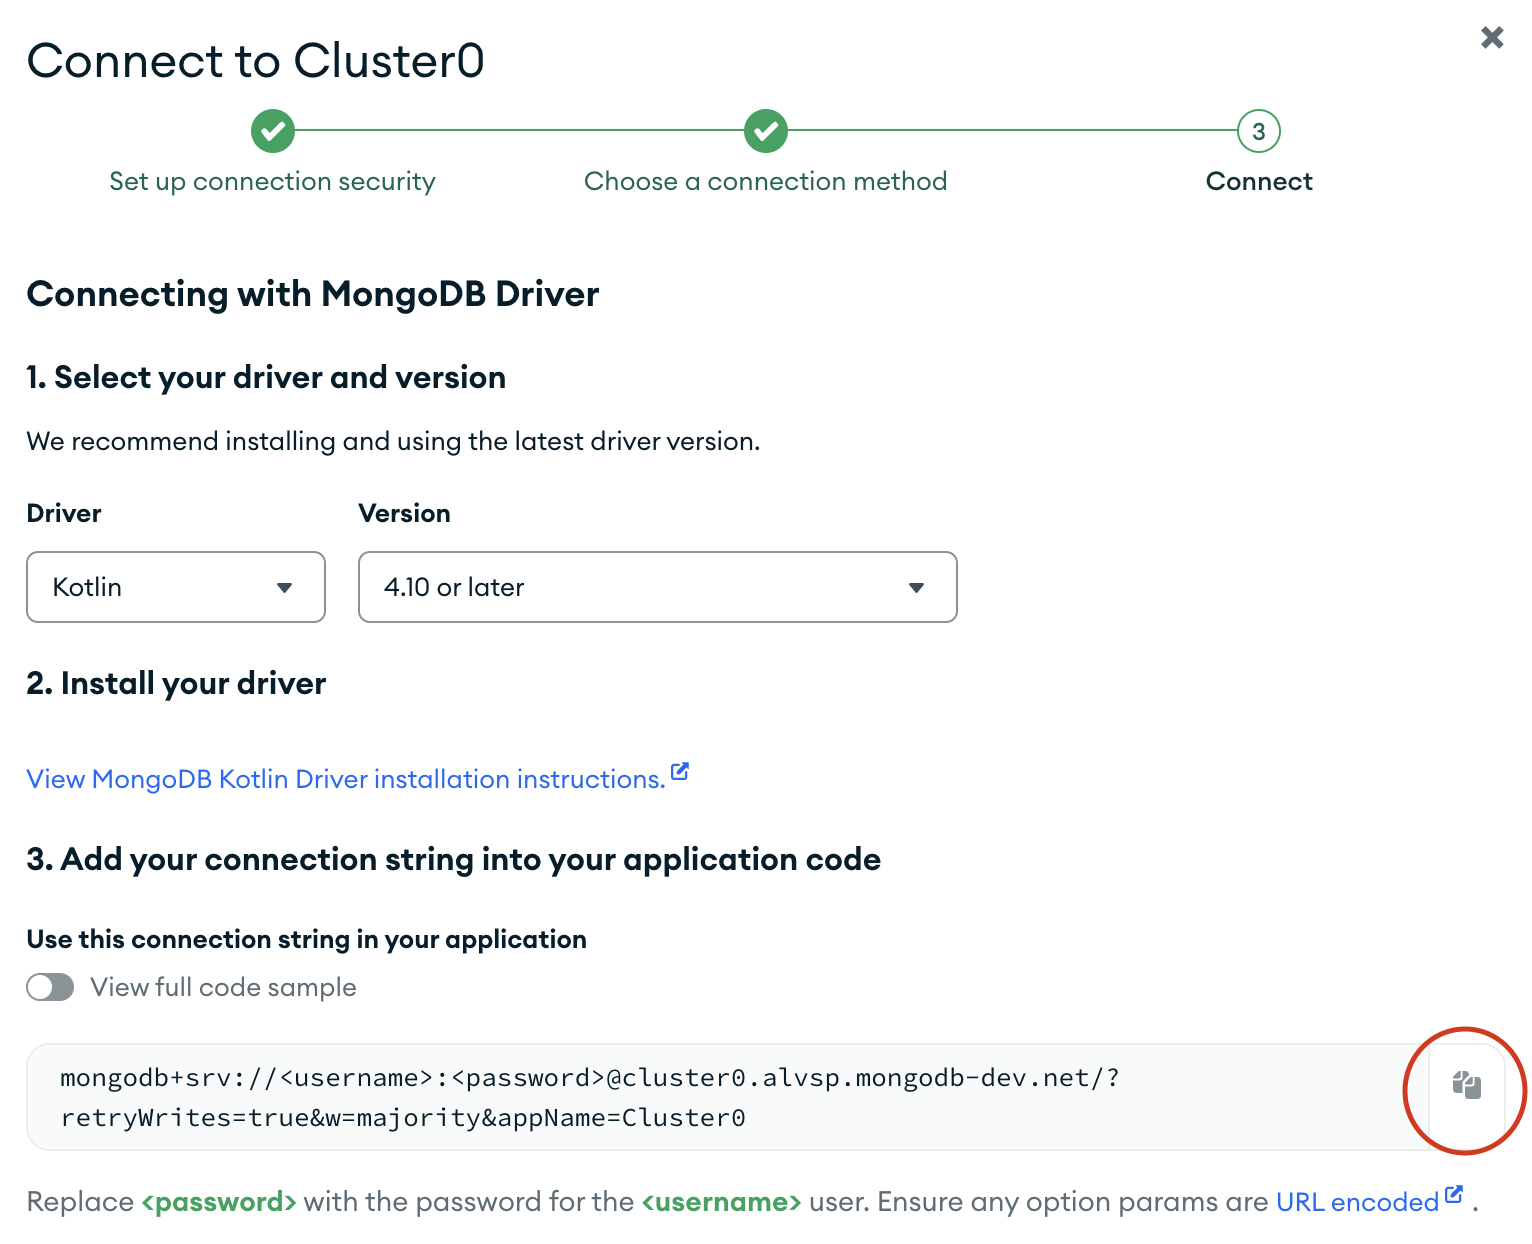
After completing these steps, you have a connection string that contains your database username and password.
Run a Sample Query
Create the Application File
Create a file called DemoDataClassExample.kt in your project.
Copy the following sample code into the file and replace the value of
the <connection URI string> placeholder with your MongoDB
Atlas connection string that you saved in the preceding step.
import com.mongodb.client.model.Filters.eq import com.mongodb.kotlin.client.MongoClient // Create data class to represent a MongoDB document data class Movie(val title: String, val year: Int, val directors: List<String>) fun main() { // Replace the placeholder with your MongoDB deployment's connection string val uri = "<connection URI string>" val mongoClient = MongoClient.create(uri) val database = mongoClient.getDatabase("sample_mflix") val collection = database.getCollection<Movie>("movies") // Find a document with the specified title val doc = collection.find(eq(Movie::title.name, "Before Sunrise")).firstOrNull() if (doc != null) { // Print the matching document println(doc) } else { println("No matching documents found.") } }
Note
This example uses a Kotlin data class to model MongoDB data.
Run the Application
When you run the application, it prints the details of a movie document that matches the query, as shown in the following output:
Movie(title=Before Sunrise, year=1995, directors=[Richard Linklater])
If you don't see any output or receive an error, check whether you included the proper connection string in your application. Also, confirm that you successfully loaded the sample dataset into your MongoDB Atlas cluster.
After completing this step, you have a working application that uses the Kotlin Sync driver to connect to your MongoDB cluster, run a query on the sample data, and print out the result.
Use the Document Class to Model Data (Alternative)
The preceding step demonstrates how to run a query on a sample collection to retrieve data by using a Kotlin data class. This section shows how to use the Document class to store and retrieve data from MongoDB.
In a file called DemoDocumentExample.kt, paste the following sample
code to run a query on your sample dataset in MongoDB Atlas. Replace the
value of the <connection URI string> placeholder with your
MongoDB Atlas connection string:
import com.mongodb.client.model.Filters.eq import com.mongodb.kotlin.client.MongoClient import org.bson.Document fun main() { // Replace the placeholder with your MongoDB deployment's connection string val uri = "<connection URI string>" val mongoClient = MongoClient.create(uri) val database = mongoClient.getDatabase("sample_mflix") val collection = database.getCollection<Document>("movies") // Find a document with the specified title val doc = collection.find(eq("title", "Before Sunrise")).firstOrNull() if (doc != null) { // Print the matching document println(doc) } else { println("No matching documents found.") } }
When you run the application, it prints the details of a movie document that matches the query, as shown in the following output:
Document{{_id=..., plot=A young man and woman ..., genres=[Drama, Romance], ...}}
If you don't see any output or receive an error, check whether you included the proper connection string in your application. Also, confirm that you successfully loaded the sample dataset into your MongoDB Atlas cluster.
After you complete these steps, you have a working application that uses the driver to connect to your MongoDB deployment, runs a query on the sample data, and prints out the result.
Next Steps
Congratulations on completing the tutorial!
Note
If you run into issues in this tutorial, ask for help in the MongoDB Community Forums or submit feedback by using the Rate this page tab on the right or bottom right side of this page.
In this tutorial, you created a Kotlin application that connects to a MongoDB deployment hosted on MongoDB Atlas and retrieves a document that matches a query.
Learn more about the Kotlin Sync driver from the following resources:
Learn how to perform read operations in the Read Data section.
Learn how to perform write operations in the Write Data to MongoDB section.